It is quite difficult to imagine, especially to the modern younger generation, what life would be like in the 21st century without the Internet and all its technologies and capabilities.
The life activity of a modern person, including his labor activity, is wholly and completely tied to the Internet, and the occurrence of problems with access to the World Wide Web is regarded as a personal disaster, which, in essence, is somewhat.
In the framework of this article, we will consider one of these global problems, which is characterized by spontaneous disconnection of the Internet connection on the computer.
Who is to blame for this? What are the reasons, and most importantly, how to solve this problem? Answers to these and other questions will be given below.
Determining the Cause - Diagnosis
So, as has been said many times, the main thing is to determine the cause. This is necessary in order to be able to identify the culprit or, at least, reduce the range of possible suspected errors.
As in most other cases, the problem of the situation in question is characterized by two main types:
- This is a hardware level issue;
- This is a software level issue.
Everything is as standard as possible.
Hardware Error Check
Surely, many already understood from the name that the word “hardware” implies the presence of physical problems with equipment. So, first of all, it is necessary to exclude possible culprits when figuring out the reasons for disconnecting the Internet.
The procedure for applying the recommendations in each case may vary, the main thing is to adhere to the basic structure and check all possible options:
- The first action is extremely logical, but it does not entirely relate to the hardware look - it is to reboot the router. Yes, it is a reboot in most cases that allows you to return the connection, but they do not fix the cause of the gap itself, which must be taken into account.
- Check the cable density on the router. All connectors must be physically sound, contacts and plugs must not contain chips, no deposits or corrosion effect of metal elements and other unauthorized changes of the original form.
- Check the power supply/adapter for serviceability. If there are appropriate tools (for example, a multimeter), make sure that the power adapter shows the indicators corresponding to the declared characteristics indicated on the sticker.
- Check the condition of the cables / wires laid in the room (residential or non-residential) and connected to the router and computer. Make sure that the cable of the provider is intact and safe, that it is not twisted, insulation is not broken, and also that the cable laying place does not intersect with sources of possible electromagnetic interference.
Confirm or deny the presence of hardware problems can only be a physical check in all possible and affordable ways.
If none of the above was recorded by you, then you should go directly to the equipment and network settings.
Solutions
It is worth noting that the connection may disappear not only when using wireless data technology (WiFi), but also when using a wired connection.
This circumstance significantly complicates the definition of the problem, therefore, for greater clarity, the main reasons (which will be discussed below) should be given in the form of a table:
As can be seen from the above table, in order to solve the issue under consideration, quite substantial work is required. And this is what should be dealt with further. First things first:
-
Incorrect software driver used
Both Wi-Fi and wired internet require driver support for the network adapter. As has been said everywhere and repeatedly, drivers in the Windows operating system, in fact, are one of the most defenseless components that are constantly subjected to "external and internal attacks."
To test this theory, you will need to roll back the driver to a previous version or delete it, followed by an update:
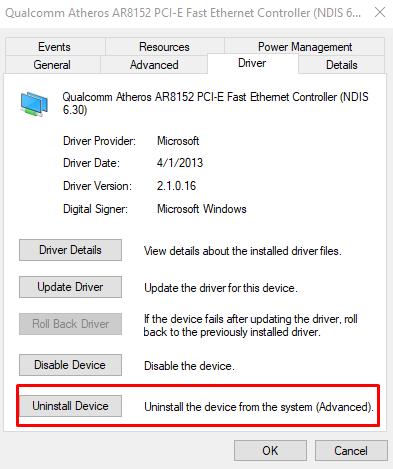
- Right-click on the icon “Computer” and select “Manage”;
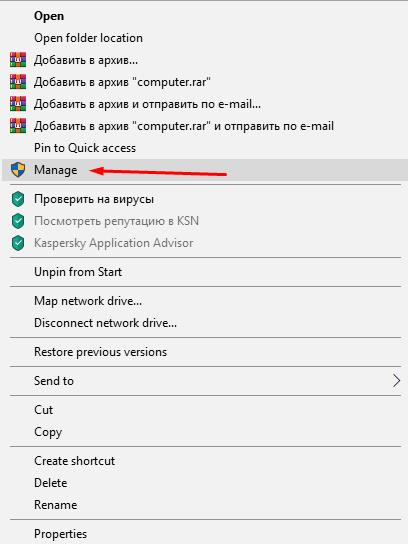
- In the Utilities directory, open Device Manager;
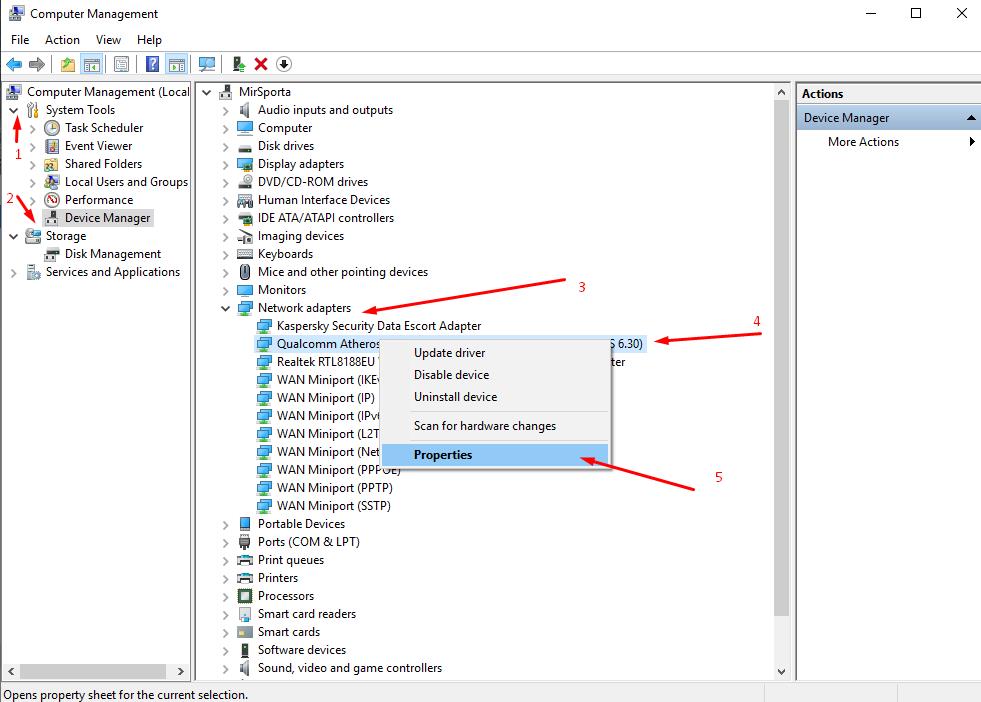
- In the list of components that opens, find and expand the “Network Adapters” section;
- Depending on which connection you are using, open the adapter you want, for example, use a wired connection with the adapter "Qualcomm Atheros AR8152 PCI-E Fast Ethernet Controller (NDIS 6.30)" as a demonstration;
- Click on the selected option with the right mouse button and open its “Properties”;
- Go to the “Driver” tab and pay attention to the version of this driver indicated there and compare it with the version that is offered directly by the developer.
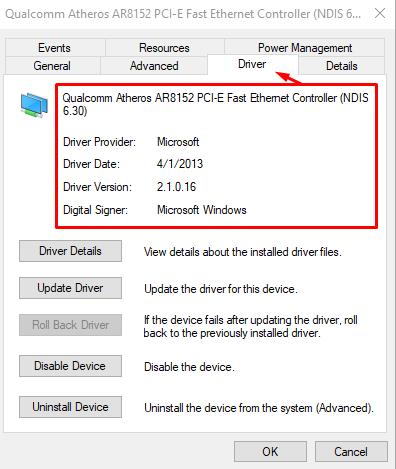
You can see the current version and download it from the manufacturer of your network card, or the manufacturer of your laptop. Alternatively, you can use specialized software, for example, DriverPackSolutions. In more detail about how to update drivers we wrote an article:How Update Drivers in Windows 10
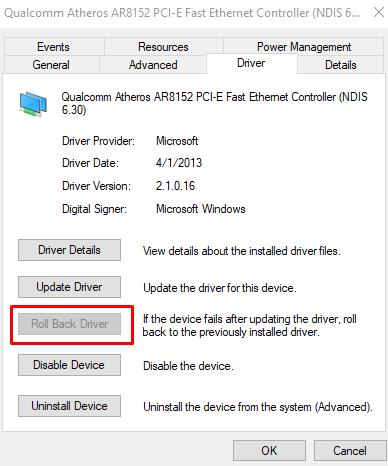
Please note that the “Rollback driver version” functionality is present in the same tab if fixed and considered problems with the connection showed themselves after updating the previously used version.
- As another alternative, you can try to remove the device (by clicking on the appropriate button), restart the computer and allow the operating system to install the driver it needs on its own. For security, you must first download everything you need, including drivers, or have another device with an active Internet connection.
-
High Network Load
- On one computer they play an online game;
- On SmartTV, they watch a broadcast;
- On one smartphone they are engaged in web surfing, on the second they are viewing content on a well-known video hosting;
- Traffic distribution is handled by an old router, purchased about 5 years ago, and up to a certain point it manages the load;
- The user on the computer minimizes the game, and includes downloading a large file;
- The Internet breaks and returns only after a reboot.
The given situation is familiar to many, and the conclusion from it suggests itself - the router simply can not cope with the modern requests of its users.
Only three ways out of this situation are possible:
- Agree on the use of traffic, with limited resources;
- Manually limit the consumption of traffic for each device manually, with a ban on exceeding limits;
- Get a more powerful router that can support the desired level of load.
The first and third options imply only the availability of agreements and / or the possibility of acquiring new equipment.
The second option can be implemented as follows: (for example, TP-LinkTL-WR940N):
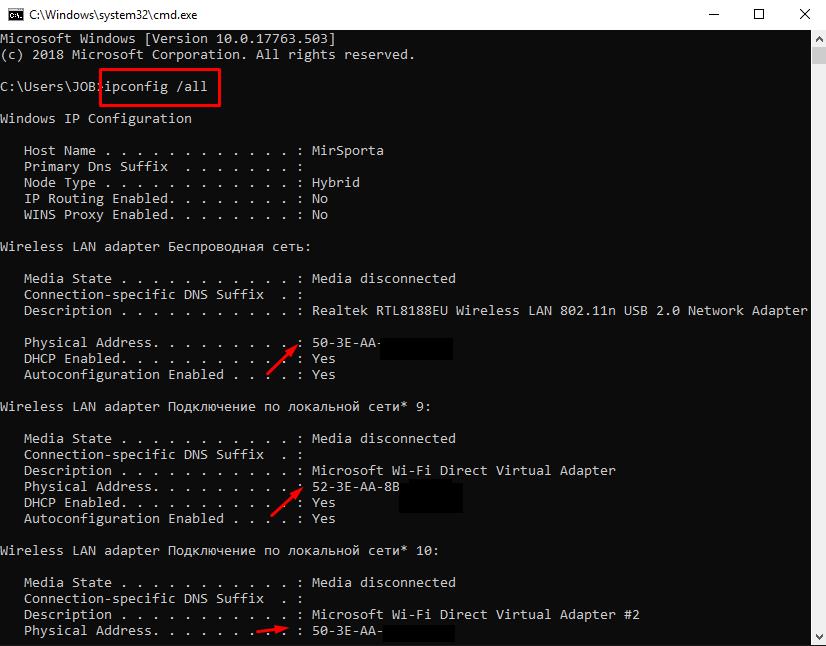
- For further work, it is necessary to determine the mac addresses (physical addresses) of devices that are planned to be used on the home network (taking the above example as a basis). To do this, open the hardware settings and see the "Information" section. This can be done in the settings of the smartphone or in the settings of the TV. In order to see this information about the computer, just open the command line and run the command “ipconfig / all”, where detailed information will be provided, including the desired mac-address will be indicated in the line “Physical address”.
- Open the router’s web interface by entering the address 192.168.1.1 (or 192.168.0.1) in the address bar of the browser;
- Enter the username and password to confirm the legitimacy of the requested access;
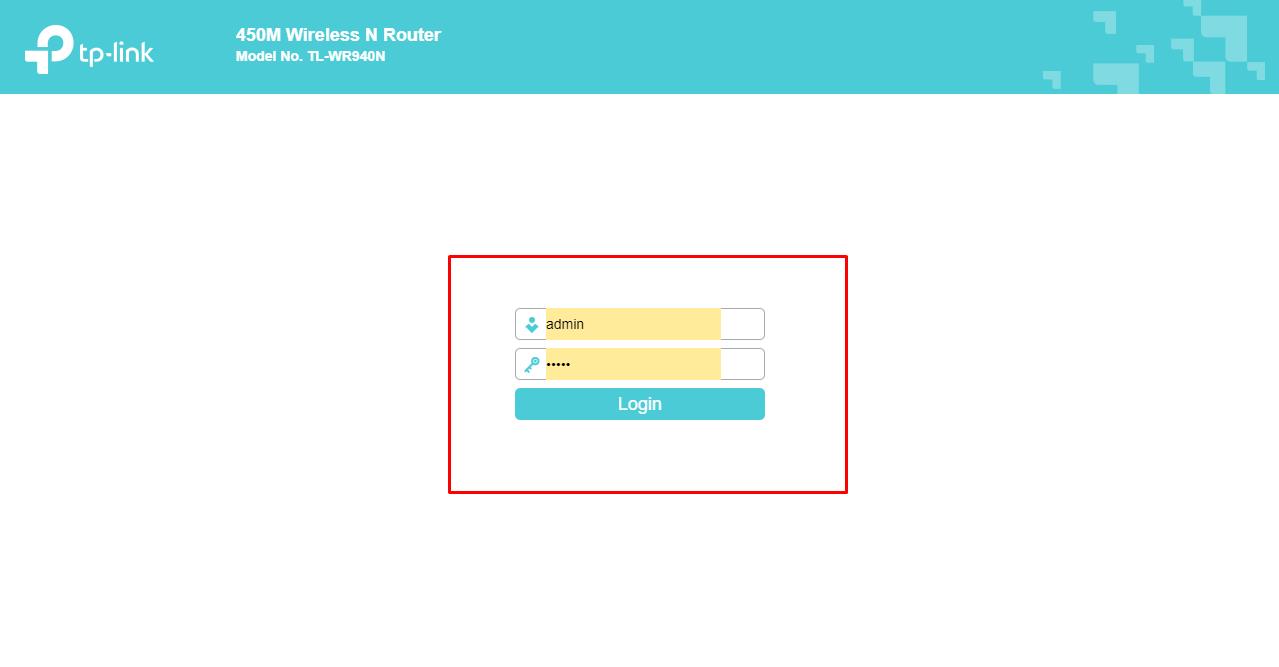
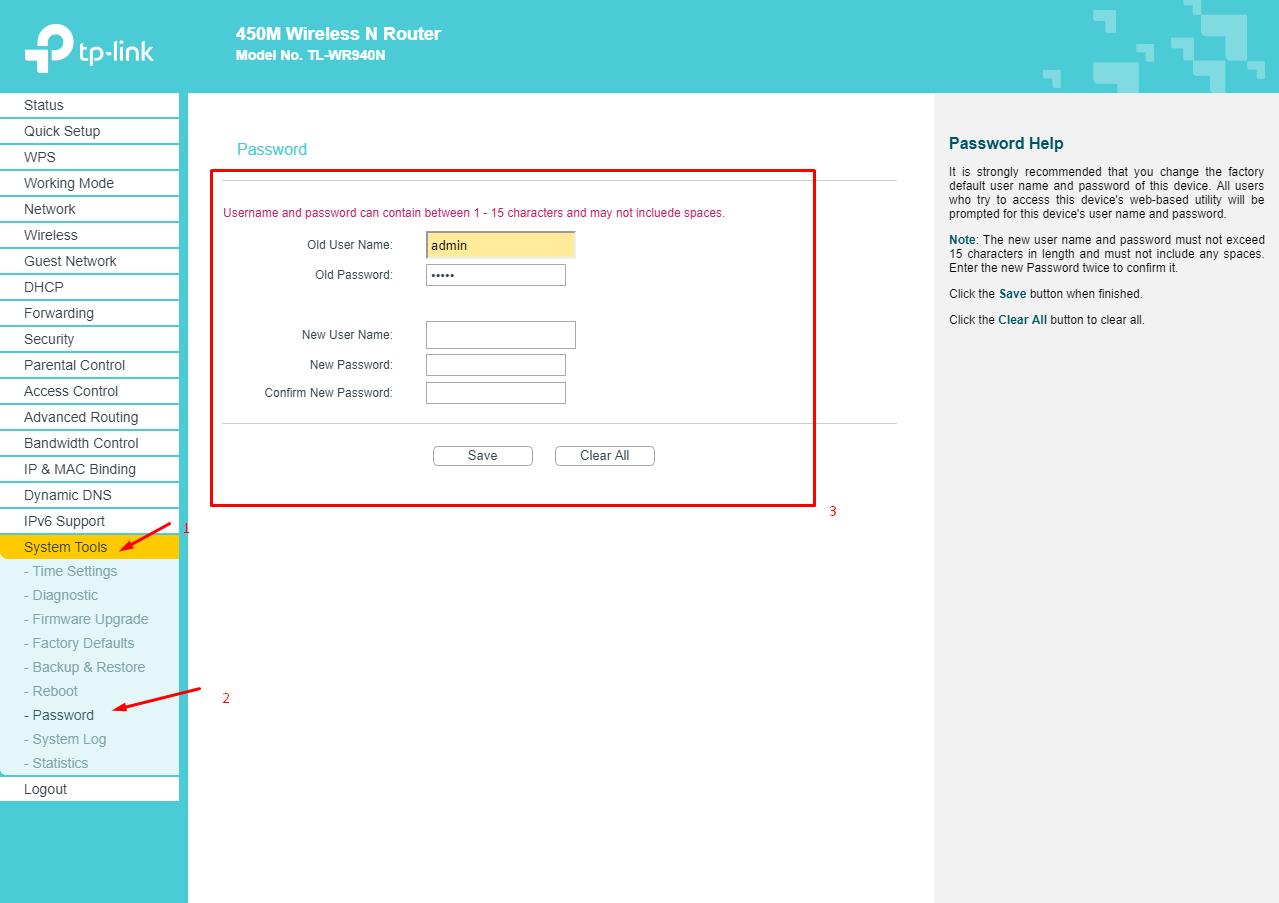
- Please note that if you still use the login/password set by default as admin/admin, then the first thing to do is change them to your own options. To do this, go to the "System Tools" - "Password".
- Open the “DHCP” section and check that the “DHCP server” is turned on and a range of assigned addresses is assigned for all devices connected to the network;
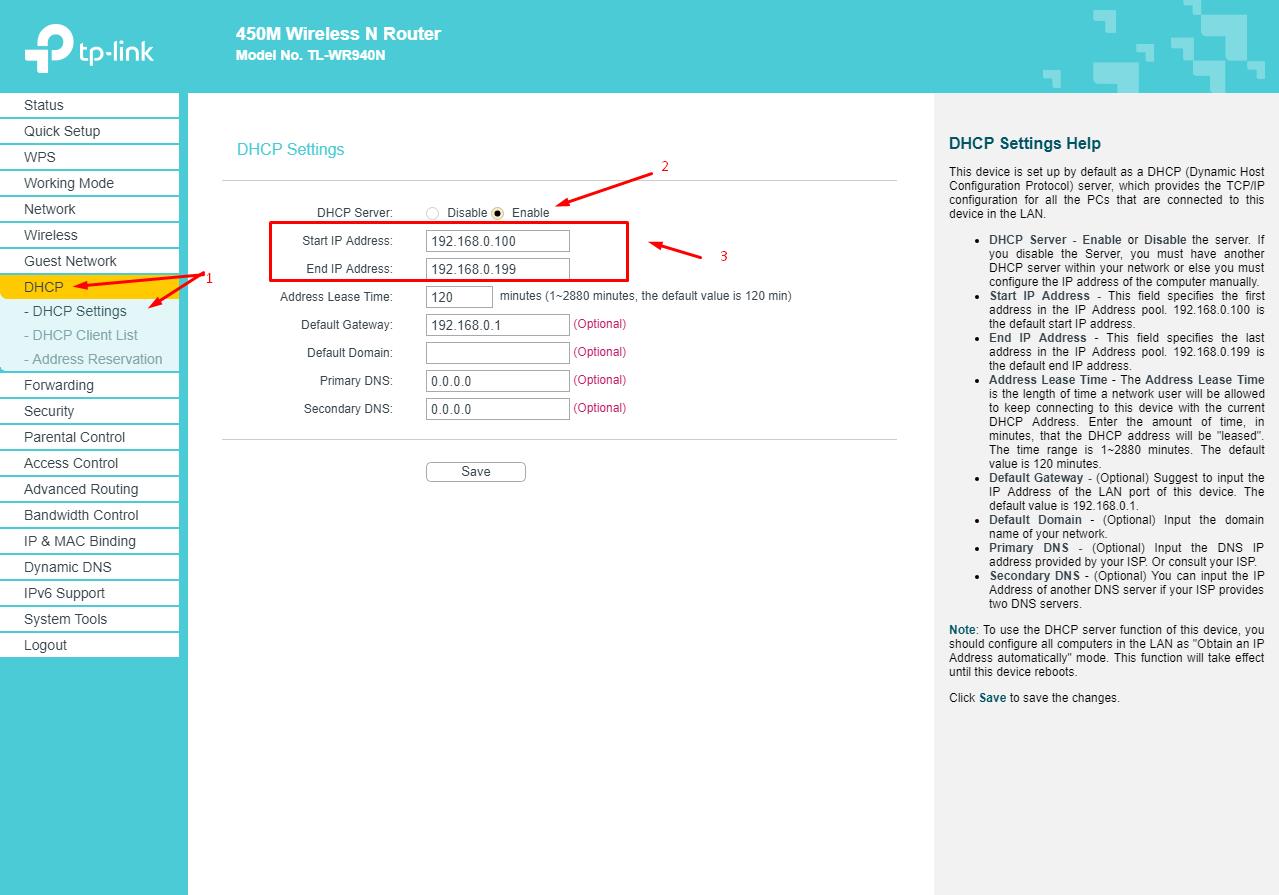
- Go to the section "Address Reservation" and click on the "Add New" button;
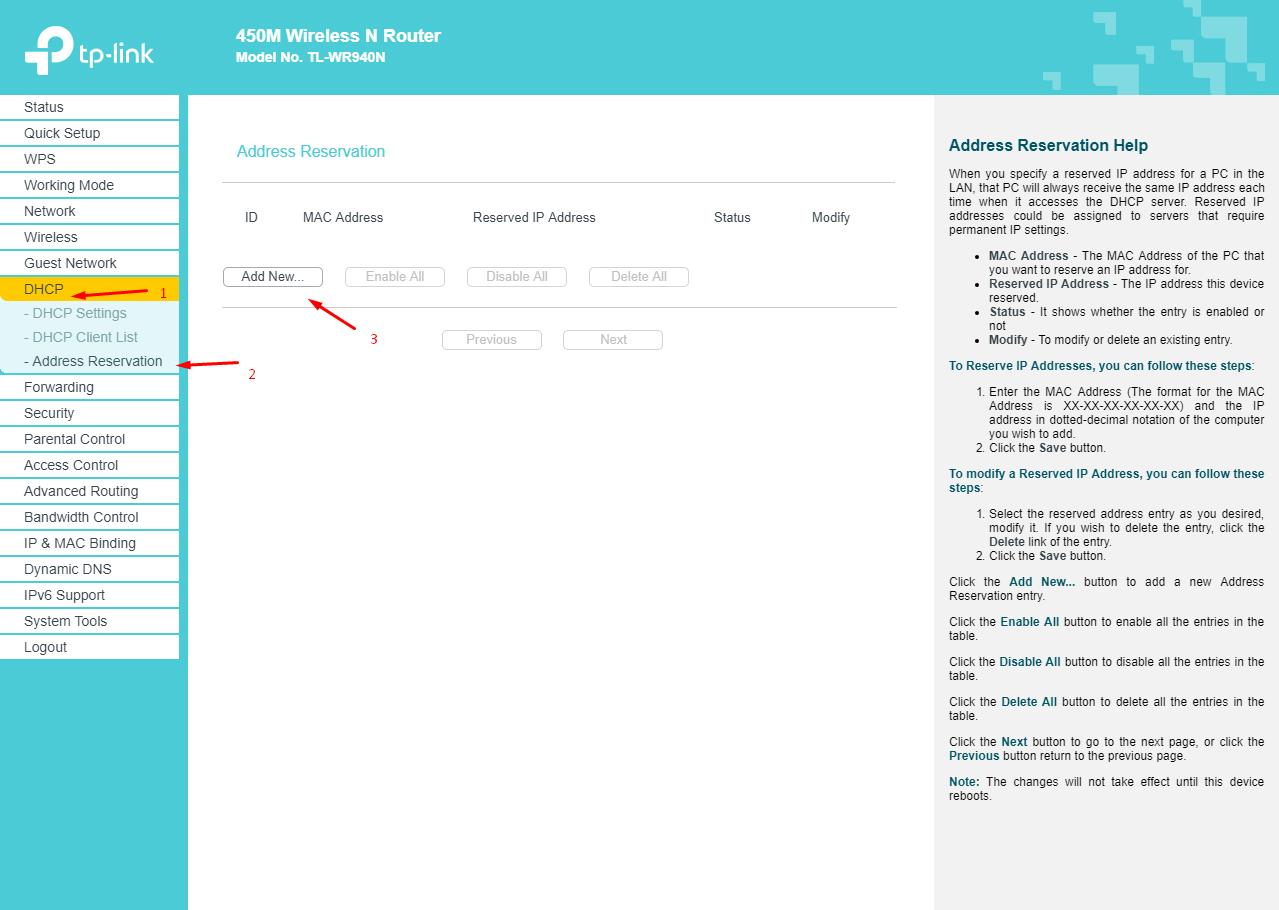
- In the line "Mac Address" enter the physical address of the device, for example, a computer, and in the line "IP Address" enter the corresponding value from the above range.

Repeat the manipulations for all the necessary gadgets.
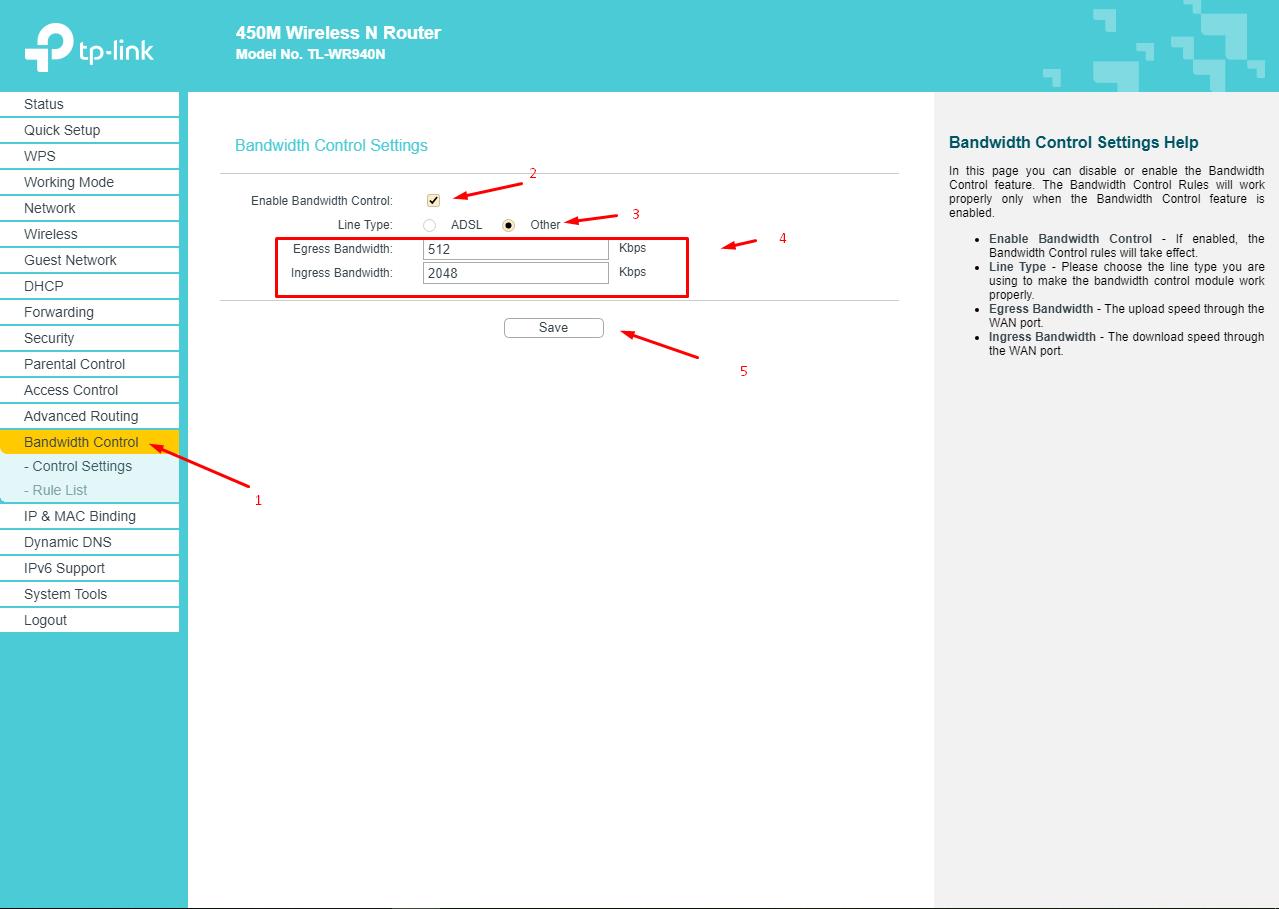
- In the line “Type of line” indicate “Other” (if there is such a parameter), configure the value of the outgoing and incoming bands taking into account individual parameters;
- Open the "List of rules" subsection and click on the "Add New" button;
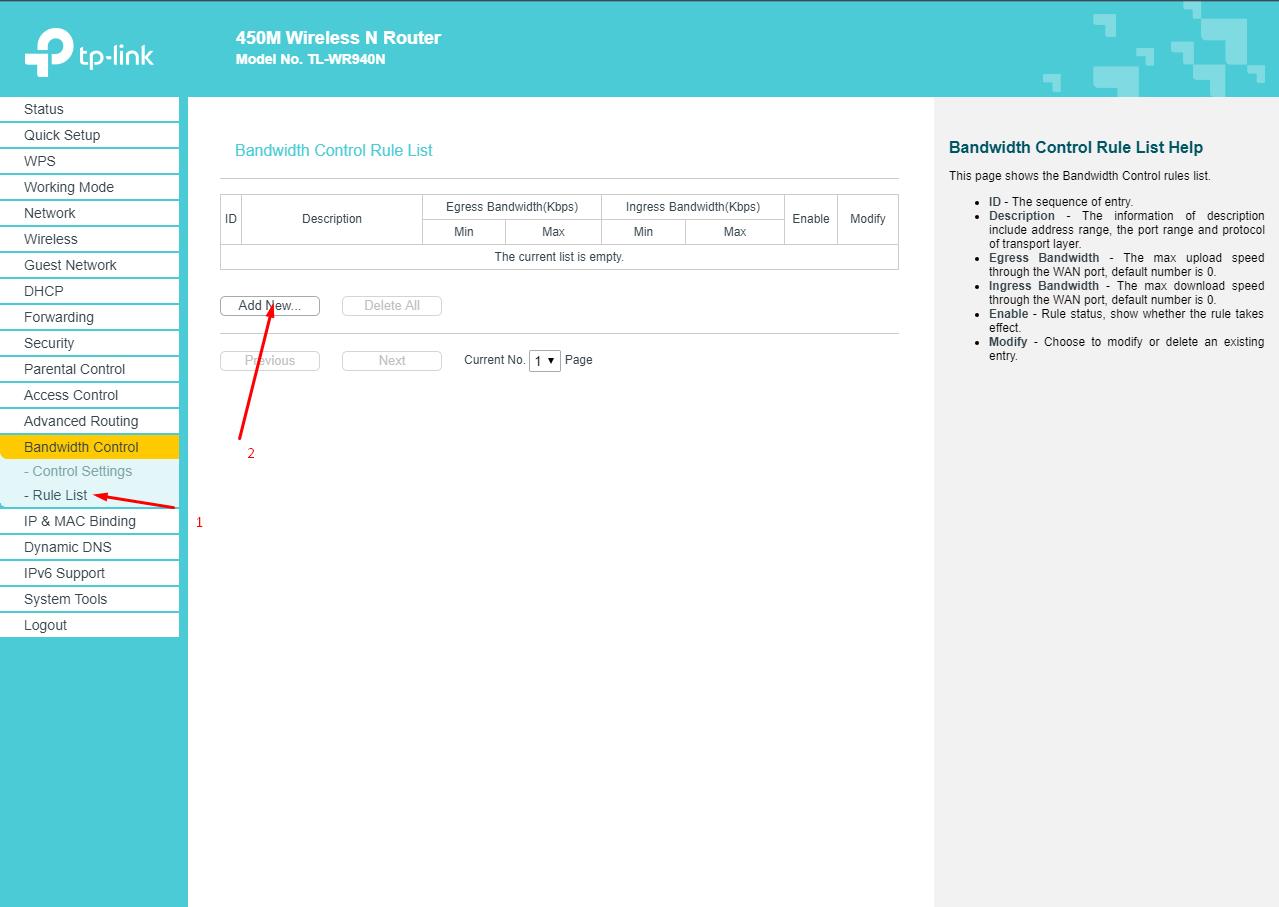
- In the "IP Address Range" line, specify the assigned ip-address, and below set the desired speed indicators that will be allocated to a specific device, for example, a computer. As part of the example, 1 Mbps for download and 1 Mbps for download were set.
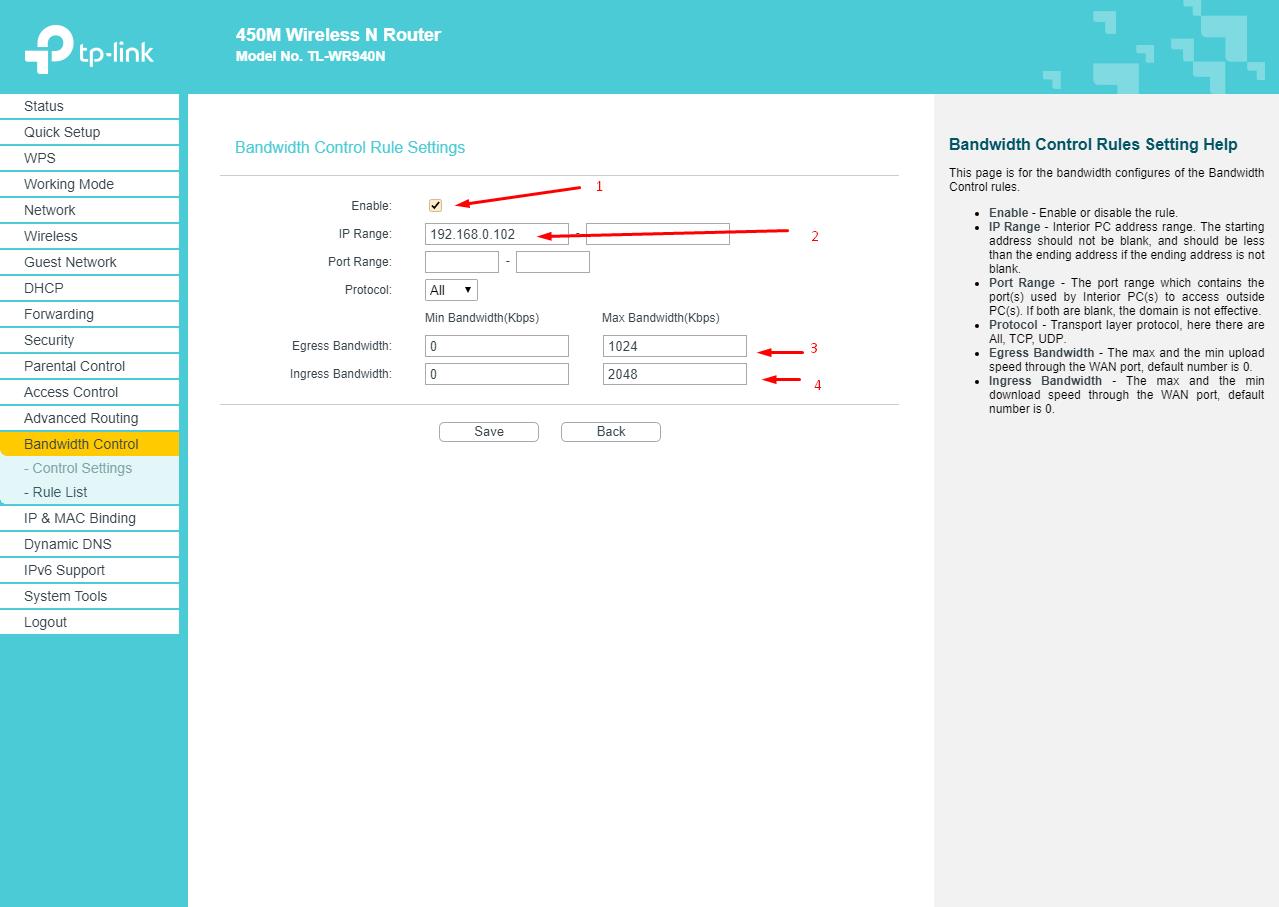
Similar actions should be repeated for all devices.
From the moment you save the settings, the computer and the rest of the device will be provided with exactly as much traffic as you authorized and no more, which will allow you to adjust the load of the router based on its actual capabilities.
-
Non-optimal Wireless Settings are Used.
It should be understood that the quality of a wireless network is affected by many factors, for example, a router is used in an apartment building, where the equipment of neighbors works in the same modes and with the same channels. This circumstance can directly affect the speed of the network and the stability of the connection, in particular, it can lead to the problem under consideration.
Therefore, you should experiment with the wireless settings:
-
Computer Power Settings
This option is quite common among users using laptops / netbooks, where to save battery power, you can disable the wireless adapter.
To set the power mode, do the following:
-
Incorrect network settings
Incorrect network settings of a computer, usually lead to a complete loss of access to the Internet, but in theory, under certain circumstances, they can lead to the considered cliffs.
- Right-click on the network connection icon in the tray and select "Diagnostics of problems" or "Troubleshoot problems";

- Depending on the results of the diagnostic utility, the recommended actions should be taken;
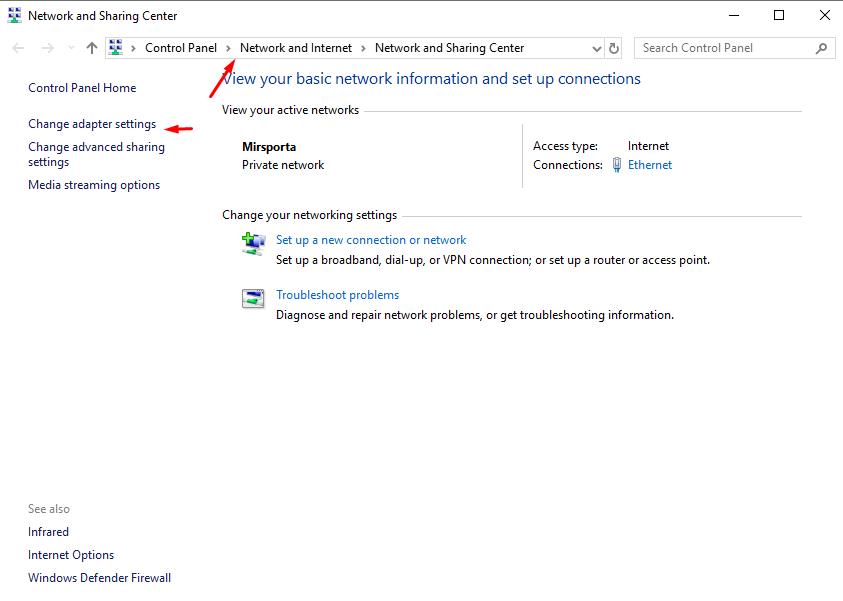
- Open the "Network and Sharing Center" - "Change adapter settings";
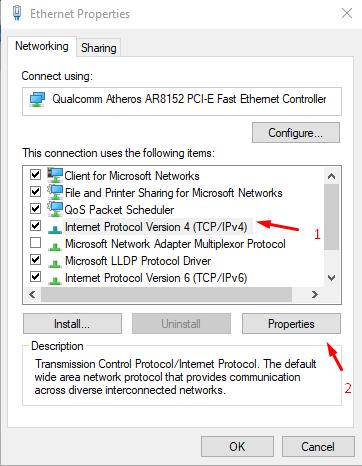
- Right-click on the connection used and open its “Properties”;
- Among the marked components, find the line “IP version 4 (TCP / IP)” and click “Properties”;
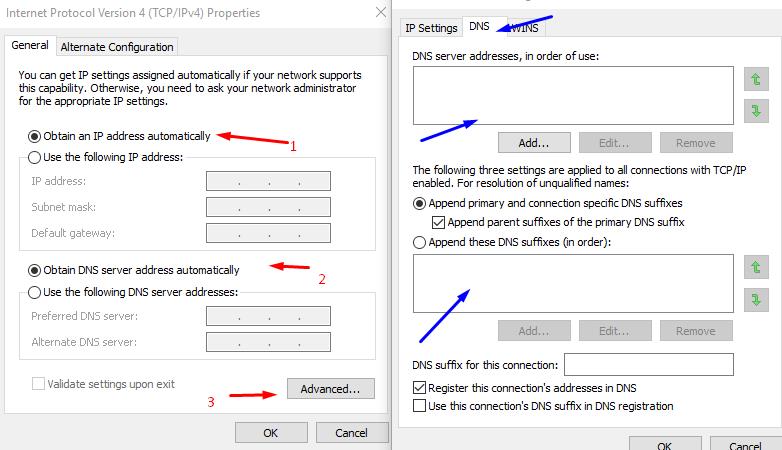
- In all the tabs there, check if there is anything extraneous or unauthorized by you. As a check, take screenshots of all windows, and simply put all the manually entered parameters into automatic mode and test the connection quality.
It will also be useful to check the operating system for virus activity by antivirus software and scan the system with the sfc / scannow scanner. There will be no harm, but there is benefit.
-
Connection Blocked by Antivirus
In most cases, this happens as a result of the work of regular means of protection - a firewall. Therefore, to confirm / refute this, you should temporarily disable it:
- Disable all elements of checking and restricting access to the Internet, installed anti-virus software;
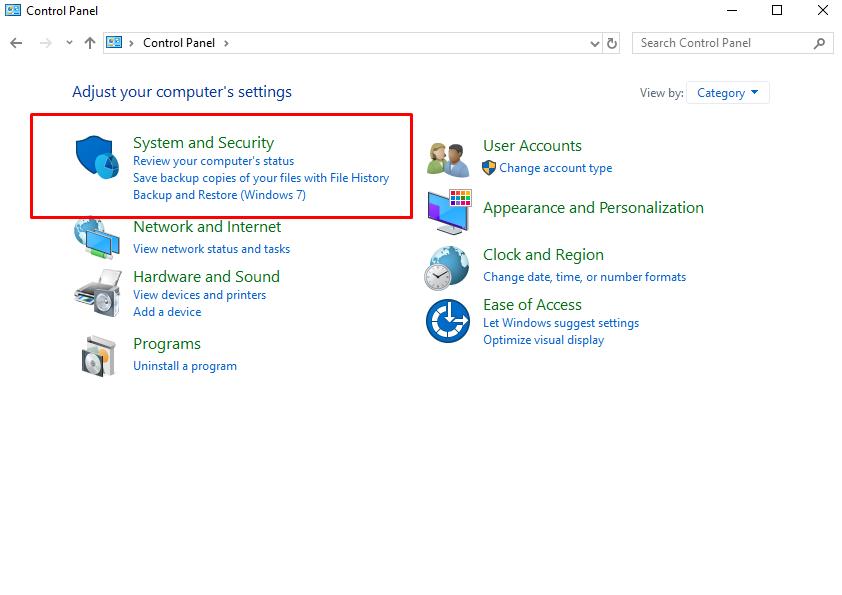
- Open the "Control Panel" and go to the "System and Security";
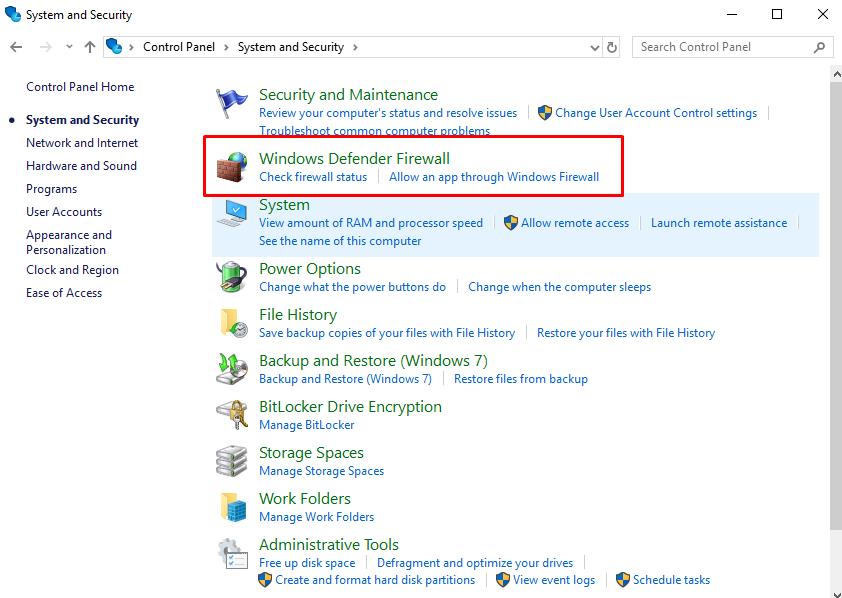
- Among the available options, select “Windows Defender Firewall”;
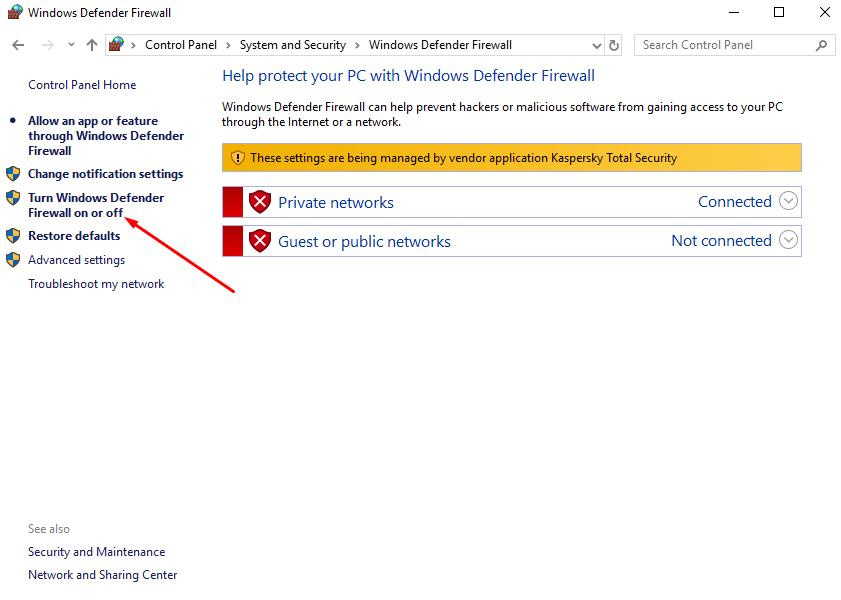
- Next, open the "Enable or disable Windows Defender Firewall";
- In the window that opens, select "Disable Windows Defender Firewall" for both the private network and the public.
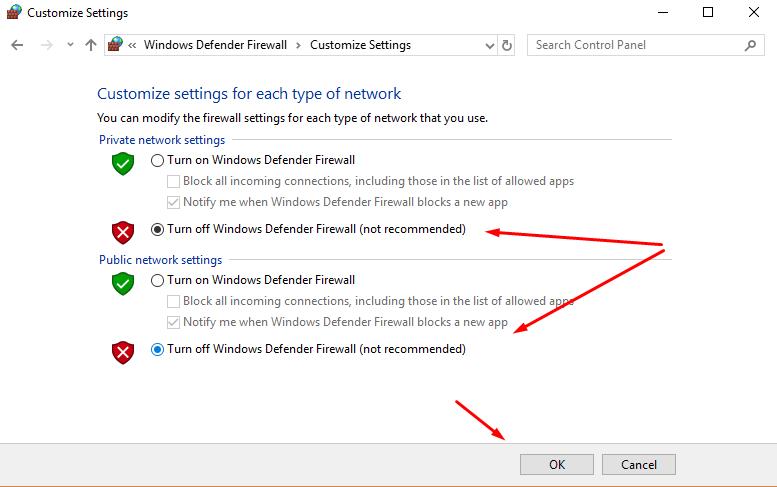
Check if the gaps are repeated or the Internet is stable. If the first option is turned on by antivirus, and if necessary, turn on the firewall.
Conclusion
If none of the above has saved your Internet connection from disruptions, then it’s just right to contact your ISP to conduct diagnostic work on your network. In addition, perhaps the reason for all this is even more prosaic - it is carrying out technical work on the side of the provider.
It is also necessary to understand that the recommendations given are general and may not help in some cases with some individual features. For example, situations were repeatedly recorded when a user did not change the standard authorization data for entering the router’s web interface, and by mistake created an open wireless access point. This was used by the "playful neighbor", wanting to mock the "friend", just turned on/off the "Internet" to him at will. Everything is possible in this matter, and even unthinkable reasons should not be ruled out.